How to make Rag Quilts
This is my first guest post! Oooh, I’m so excited! I asked Beckie from Infarrantly Creative if she could do a tutorial on a Rag Quilt, 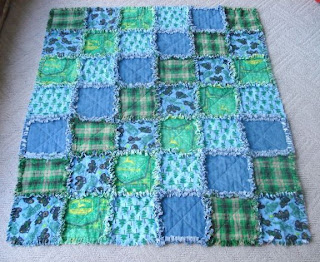 decades years months days ago (my days, months and years all run together) – I explained that I was special and needed LOTS of pictures to understand what she was talking about. If you not into sewing – go see her site just for her Roadkill Rescues…I could stay there for hours and look at all the creativity!She came through! Thanks Beckie – You are a doll!
During that time, I had found another blog, MOODY GIRL PROJECTS who also had a FAB Rag Quilt.

She did hers a little different so hop on over there and see hers as well.
I can’t wait to do one or get one!
I love these!
Now on to the guest post….
How to make Rag Quilts!
Posted with permission from Infarrantly Creative.

Walking foot – this is a strong recommendation! (If you don’t have one they sell them on Ebay for cheap seller: dafent)
Thread
Fabric (you can use anything 100% cotton – I like flannel the best because it is so cozy)
Batting – I use Warm & Natural (Joann Fabrics) A walking foot looks like this. You don’t need, need, need one but if you are going to make a few they are definitely worth the investment. Just make sure you order the right one for your particular machine.

- Throw 49” x 63” -11.25 yards of fabric – 63 quilt sandwiches
- Large throw 63” x 77” -18.50 yards of fabric – 99 quilt sandwiches
- Crib 35” x 49” -6.25 yards of fabric – 35 quilt sandwiches
General directions:
This is a fun scrappy project so don’t worry about which color of fabric is next to each other or if a plaid is straight. Due to the nature of this quilt, it is not necessary to be “perfect” in cutting, pinning, or piecing. After the completed quilt is washed, the frayed edge hides a multitude of sins. Do not pre-wash the batting or flannel. Remove selvages. All seam allowances are 1″. Yes, 1″. Use a walking foot for all sewing. All stitching and seams are on the “outside” of the quilt. Press or pin all seams open, as you would when sewing a garment.
1. Begin by cutting out your squares of fabric. I use 9″ squares. To cut I use a quilting ruler, rotary cutter, and mat. But you don’t have to do it that way if you don’t have the supplies. Just measure and cut 9″ squares with scissors if you must.
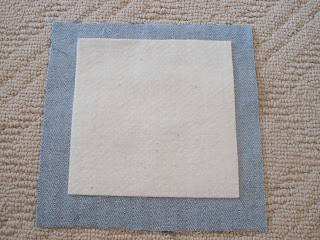
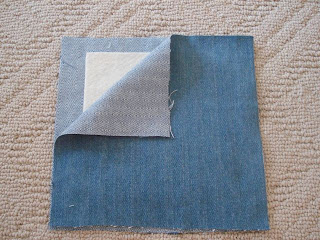
2. Cut the Warm & Natural batting into 6 3/4″ squares. Look above at the size you are making. However many “quilt sandwiches” it says for your particular size that is how many squares of Warm & Natural batting you will need. Sewing a “Quilt” Sandwich: When making your sandwich, be sure that the right side of the fabric is on the outside. Center a batting piece on the fabric. It isn’t necessary to use the same fabric on the top of each “quilt sandwich” as on the bottom. Top with another fabric square. Pin in place (if you like pinning. .. . I don’t pin though).
3. Using a matching, contrasting, or a specialty thread, sew an X on each of the “quilt sandwiches”. You can use a pretty wide stitch since it isn’t holding the quilt together rather just giving it a quilted look. After all the X’s are stitched on the squares you are ready to assemble them.

4. When you have completed all your sandwiches it is time to sew them together. At this point it does not matter which side is which because they look exactly the same.When sewing the “quiltlets” together lay them back-to-back (wrong sides together) so the fringed seams appear on the front of the quilt.


5. I lay out all my squares so I can make sure I like the pattern. Then using a 1″ seam allowance I sew the first row of squares together, followed by the second, etc. I sew all the rows together first. I do actually pin the rows together. It is much easier. Then I sew the first row to the second row and keep adding the rows until the quilt is assembled making sure to pin the seams down.


6. It will look similar to this when it is all sewn together. Once the whole quilt is together BEFORE cutting/clipping the edges (seam allowances), you will want to stitch around the entire quilt outside to make sure NO batting is showing. This, too, will be about a 1-inch seam allowance making sure the seams are pinned down. Now you want to clip all the edges (be careful not to clip through the seams) about every 1” or less depending on your liking.

7. Grab yourself a cup of coffee for this step. Turn on some music or watch a movie and let’s begin. This is the time consuming part. Using utility, heavy-duty scissors (Fiskars has the easy grip rubber handled ones, loves those, easy on the hands), clip all seam allowances almost, but not quite, to the seam. Make clips 1/4″ – 1/2” apart approximately. This is what makes the fringed look. Clip all the seams and around the quilt.


8. You will then put the quilt in the washing machine, full cycle, with fabric softener and a bit of detergent. Wash fully. Dry fully. You will want to change the lint traps OFTEN during the course of drying. Once dry, fully shake the quilt good once or twice outside, removing any loose threads.

Blessings to you!!! You are loved!!!
P.S. If you make one – let me know!!!


I LOVE rag quilts, too! They are quick, easy and so soft & warm. I made a few for Christmas and have one left. I’m using pictures (thanks to Amanda @ Amanda & Kevin) to personalize one for my Dad.
btw, love your blog, too!
I don’t think there is a “Right” or “Wrong” way…I appreciate both methods.
The end results are both beautiful and would be great family “heirlooms”.
Thanks for the link 🙂
Infarrantly Creative did hers the right way! (vs. my wrong way!)
I might have to try her method sometime 🙂
Hey I can do that. I have been looking for a SIMPLE pattern for a first time quilter and thank you so much for providing it. I also like the bigger squares that is just perfect for what I am looking for..